How to Implement a Simple 3rd Person Controller in Godot 3D
A Godot 3D Tutorial
The purpose of this tutorial is to demonstrate the minimum necessary steps to implement a 3D, third-person game in Godot with full camera control and player movement.
The intended audience is developers who are familiar with Godot and have developed 2D games but have no prior 3D experience.
It is NOT:
NOT a high-quality template to build a 3D game off of (it’s lacking basic quality enhancements such as smoothing).
NOT intended for developers completely new to Godot (if you are, I recommend starting here).
NOT a general 3D tutorial (to learn more about Godot 3D, see the official tutorial).
Steps
Note: All the code for this tutorial can be found here.
Pre-Requisites
Godot >=3.5 Installed (not sure if 4.X will work, I haven’t tried yet)
A 3D model to use for the player character (you can use mine: download it here)
3D Editor Navigation Tips
This tutorial assumes that you’re completely new to Godot 3D, so here are a few quick tips for navigating the 3D editor:
For more tips on navigating the 3D editor, check out this video.
Start the Project
Create your project and make the first scene that will serve as the Main scene for the demo. Make its root node `Type: Spatial`.
Creating Walls
Now let’s create some walls that can serve as reference points for movement in the demo.
Add a child node of `Type: StaticBody` to “Main”. Let’s call it “Wall1” (since we’re going to add several more walls shortly).
StaticBody requires a child CollisionShape node to define it shape for collisions: add a node `Type: CollisionShape` to “Wall1”.
Now we need to define an actual shape for the “CollisionShape”. Let’s use the `BoxShape` because it’s the simplest. You can mess around with the `Extents` as you like to define the size of the wall. What you will have at this point should look something like this:
The player still won’t be able to see our wall currently, so we’re going to add a child node of `Type: MeshInstance` to the “Wall1” node. In 3D modeling, a “mesh” is a collection of vertices, edges, and faces that describe a 3D polygon.
On this “MeshInstance” add a `Mesh` to its properties. Let’s do a `CubeMesh` (reflecting the “CollisionShape”) and make its `Size` values match the “CollisionShape”’s. You’ll notice that the `Size` values on the “MeshInstance” have to be double the values of the `Extents` on the “CollisionShap” - that’s because `Extents` are half the width/length/height of the box (see the docs).
Now duplicate this wall a few times so we can place them around the space and provide several points of reference for the player. Place the walls in various positions (they’re all at the same position currently). You can try dragging them around with the 3D editor or manually set their positions with the `Spatial.Transform.Translation` properties.
You should have something like this:
Create Your Player Model
Let’s create a folder to hold all our Player assets, scenes, and scripts. Create a “Player” folder under `res://`. Now create your “Player” scene of `Type: KinematicBody`.
We need a 3D model to represent our character. You could use a `MeshInstance` or create your own with Blender. For the purposes of this tutorial, feel free to import mine (you can download it here).
Import all the files used for your 3D model (all “.material” and walle.glb files if you’re using mine) by dragging them into the “Player” folder in the Godot editor.
Before we add the 3D model to the “Player” scene, add a `Type: Spatial` node to the Player scene and call it “ModelPivot”. This will be helpful later when we implement player movement.
Now add our 3D model to the “Player” scene by dragging the *.glb file (“walle.glb” in this example) on the “ModelPivot” node. We have our character model!
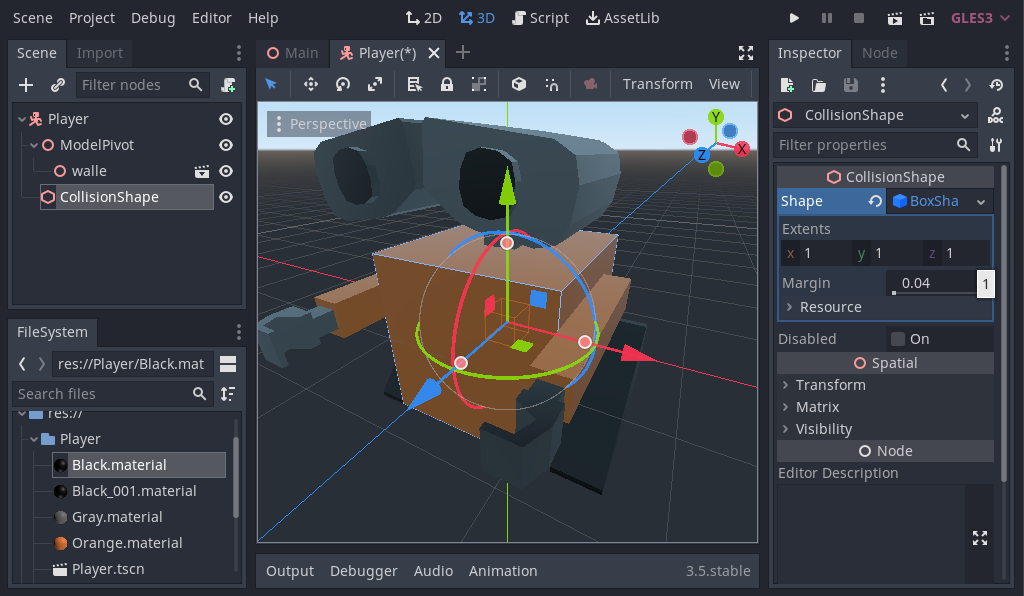
The last step here is to add a `CollisionShape` to the root `KinematicBody` node so that the player will bump into walls. Add a `Type: CollisionShape` node as a child to the root `KinematicBody` node (called “Player”) and set its `Shape` to be a `BoxShape` like we did before for the walls. The default `Extents` (1x1x1) should suit our model just fine, but feel free to play around with it.
We now have our 3D player character!
Lastly, let’s add it to the Main scene:
Add the Player Camera
In Godot 3D, you must have a Camera node in the scene in order to see anything when you start the game. So now that we’re adding a `Camera` node, you’ll finally be able to run the game and see something.
For this tutorial, we want to move the camera around the player character according to the player’s mouse movement.
“Yaw” is the term for side-to-side turning of the camera (around a vertical axis).
“Pitch” is the term for up-and-down movement of the camera (around a horizontal axis).
Essentially what we’re going to be doing is setting up a camera rig.
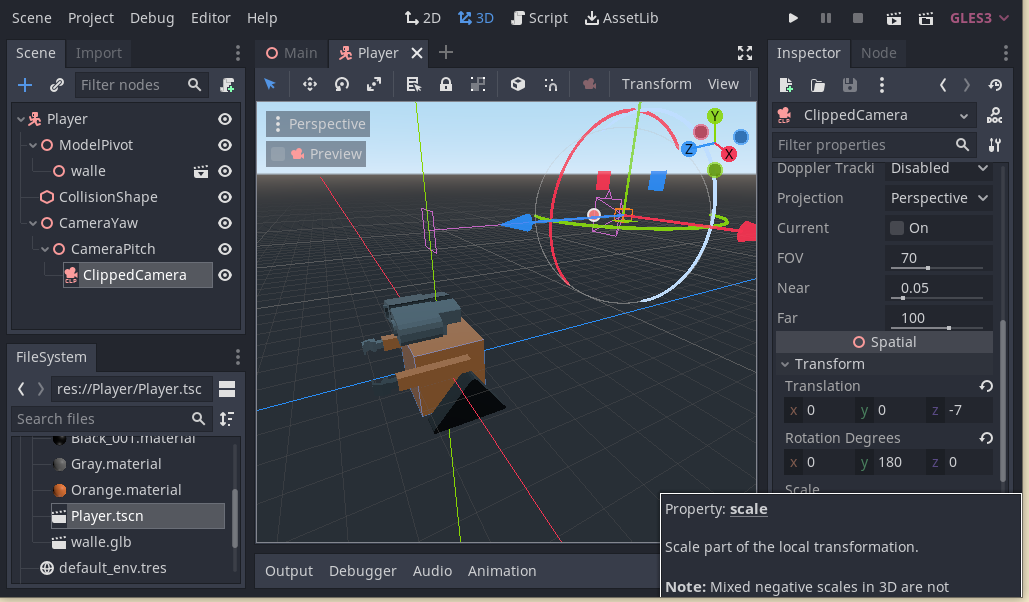
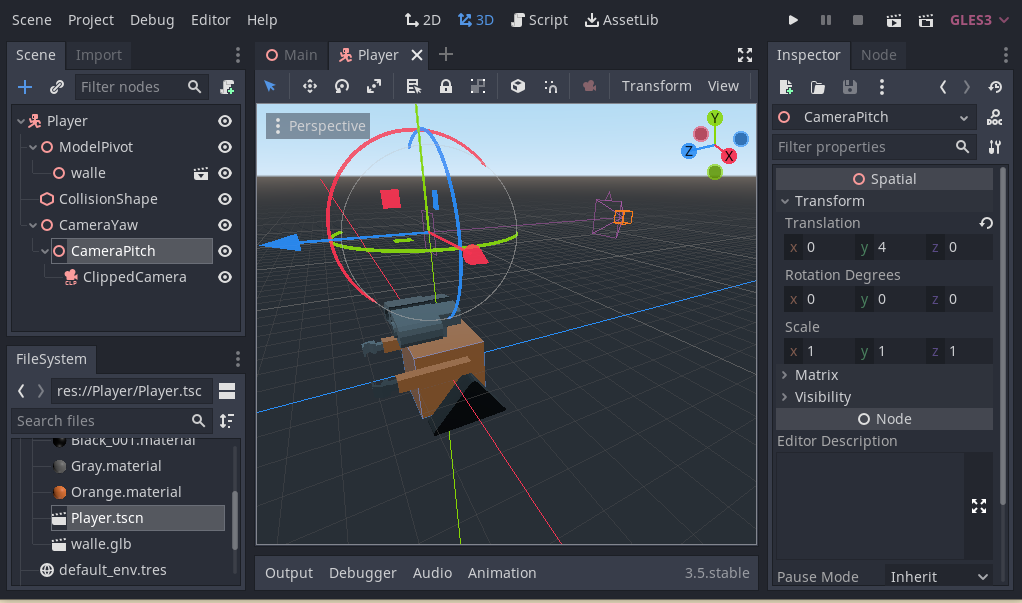
Before we add the Camera node itself, we’re going to add two `Type: Spatial` parent nodes: the first one we can call “CameraYaw”, and then a child of that called “CameraPitch”. Finally, as the child of “CameraPitch”, add a node of `Type: ClippedCamera` (which is different from `Type: Camera` because it will collide with bodies - which is desired for our 3D camera to ensure that it doesn’t go behind walls).
In the 3D editor, drag “CameraPitch” (or manually set its `Transform.Translation.y` value) so that it’s above the character model. I’d recommend a value around 4.
Then, drag “ClippedCamera” (or manually set its `Transform.Translation.z` value) so that it’s behind the character model. I’d recommend a value around -7.
Lastly, we need to rotate the ClippedCamera so that it’s facing the character model. Set the “ClippedCamera”’s `Transform.Rotation Degrees.y` to be 180 (‘y’ because this means we’re rotating around the y-axis).
Here’s what we should have:

Now we can finally run the game and see something!
Reminder: Make sure you didn’t forget to instance the “Player” scene into the “Main” scene!
Implement Camera Movement
Now we’re going to start writing some code. We’re going to implement camera movement based on the player’s mouse input, and we’re going to make use of the “CameraYaw” and “CameraPitch” nodes that we set up for ourselves.
Start by attaching a “Player.gd” script to the root “Player” node (Note: this might not be the cleanest coding practice, but it simplifies things for this tutorial).
In the script, add this code:
extends KinematicBody

export var camera_rotation_sensitivity = 0.01


func _ready():
	# Makes your mouse disappear from the screen
	Input.set_mouse_mode(Input.MOUSE_MODE_CAPTURED)

func _input(event):
	if event is InputEventMouseMotion:
		var camera_rotation = event.relative * camera_rotation_sensitivity
		# "yaw" is the term for side-to-side turning of the camera (around a vertical axis)
		$CameraYaw.rotate(Vector3.DOWN, camera_rotation.x)
		# "pitch" is the term for up-and-down movement of the camera (around a horizontal axis)
		$CameraYaw/CameraPitch.rotate(Vector3.RIGHT, camera_rotation.y)
Now run the game and try it out!
Tip: To quit the game, press ‘F8’
Implement Player Movement
The last thing we’ll do is add player movement. We’ll use the WASD keys to move the player, so set your Input Map in the Project Settings to something like this:
Now we’re going to some additional code to the “Player.gd” script. First, add a new variable at the top of the script that lets us tweak the magnitude of the player’s movement (their “speed”):
export var speed = 10.0Then add this function to the script:
func _physics_process(delta):
	var input_direction = Vector3()
	input_direction.x = Input.get_action_strength("move_left") - Input.get_action_strength("move_right")
	input_direction.z = Input.get_action_strength("move_forward") - Input.get_action_strength("move_backward")
	input_direction = input_direction.normalized()

	var movement_direction = Vector3()
	if input_direction != Vector3.ZERO:
		# The direction of movement will be the input direction rotated in the direction of the camera
		movement_direction = input_direction.rotated(Vector3.UP, $CameraYaw.rotation.y)
		# Rotate the model so that it's facing the direction of movement
		$ModelPivot.look_at(self.translation - movement_direction, Vector3.UP)

	var velocity = Vector3()
	velocity.x = movement_direction.x * speed
	velocity.z = movement_direction.z * speed

	move_and_slide(velocity, Vector3.UP)
You can re-run your game at this point and you should have full control over the camera and the character’s movement!
The final script should look something like this:
extends KinematicBody

export var speed = 10.0

export var camera_rotation_sensitivity = 0.01


func _ready():
	# Makes your mouse disappear from the screen
	Input.set_mouse_mode(Input.MOUSE_MODE_CAPTURED)


func _physics_process(delta):
	var input_direction = Vector3()
	input_direction.x = Input.get_action_strength("move_left") - Input.get_action_strength("move_right")
	input_direction.z = Input.get_action_strength("move_forward") - Input.get_action_strength("move_backward")
	input_direction = input_direction.normalized()

	var movement_direction = Vector3()
	if input_direction != Vector3.ZERO:
		# The direction of movement will be the input direction rotated in the direction of the camera
		movement_direction = input_direction.rotated(Vector3.UP, $CameraYaw.rotation.y)
		# Rotate the model so that it's facing the direction of movement
		$ModelPivot.look_at(self.translation - movement_direction, Vector3.UP)

	var velocity = Vector3()
	velocity.x = movement_direction.x * speed
	velocity.z = movement_direction.z * speed

	move_and_slide(velocity, Vector3.UP)


func _input(event):
	if event is InputEventMouseMotion:
		var camera_rotation = event.relative * camera_rotation_sensitivity
		# "yaw" is the term for side-to-side turning of the camera (around a vertical axis)
		$CameraYaw.rotate(Vector3.DOWN, camera_rotation.x)
		# "pitch" is the term for up-and-down movement of the camera (around a horizontal axis)
		$CameraYaw/CameraPitch.rotate(Vector3.RIGHT, camera_rotation.y)
Final Thoughts
Thank you for reading! If you’re interested in the following steps to create high-quality third-person controller/shooter controls, I’d recommend this tutorial which served as the basis for this tutorial.
For more games n’ stuff from me, you can find me on Itch.io & Twitter.


